Wednesday, December 10, 2014

Daddy's Pinoli Cookies


 Buon Natale! Merry Christmas!  By far, the most popular post on the blog.
These Pinoli cookies are so easy, just takes a bit of pratice and patience.  Remember, good food can not be rushed.  Buon Appetito!


Ingredients:
8 ounces almond paste Made fresh or available out of can (See previous post on Home Made almond Paste). DO NOT USE THE TUBE VARIETY.
1/2 cup all purpose flour
1/2 cup confectioners sugar
1/2 cup white sugar
approx. 8 ounces pinoli loose in a bowl
2 large egg whites
Method:
In a bowl of a food processor, pulse your almond paste a few seconds to break apart. Then add your sugars and pulse.  Add your flour and pulse again.  Cover the top of your bowl while you do this for a few seconds. Slowly add your egg whites with your machinue running on low. In a few seconds, notice your mixture softening and creamy. Your mixture should come together into a sticky ball.   Add some more flour if need be.  Remember, the more flour you add, the bigger the cookie.  If you prefer your cookie a bit more dense,  do not add additional flour.   Set aside for few minutes in the refrigerator if it looks to creamy. You should be able to pick it up with your fingers. If yo yu can't, add some more flour. It's very forgiving. Wet your hands some. Using a tablespoon, scoop up some of the mixture. Using your hands, roll lightly and flatten. Pass the cookies in the pinoli. The pinoli will stick to the cookie. Don't worry about the mess. They will not burn if you keep an eye on them. Place on a parchment lined baking sheet / several inches apart. I made about 20, 1-1/2 inch cookies.
Bake in a 300F, preheated oven for 25-27 minutes. The bottoms should be golden, but your tops should be a lighter color. You will also notice a slight crackling of the cookie itself.  Do not worry, let cool and Enjoy!
Pass the Amaretto please!
(Please watch that cooking time, as ovens will vary).
Thank you to Italian Food Forever for the Reminder and a great recipe post that made me give this a test and a try. I have tweeked it just a bit. You know how I love tradition here at Sunday at the Giacometti's. This recipe can be made Gluten free too. Omit the Flour entirely if you like. You will not get a fluffy cookie, but it will still be delicious. Buon Natale! 


Sunday, December 7, 2014

Simple Veal Osso Buco

What a great day preparing my Veal Osso Buco.  I am not sure why people are so intimidated when it comes to this dish.  It is really rather simple.  Patience is not easy for a hungry cook.   I always suggest several things to my students and to anyone trying to cook this for the first time.  The first, never cook anything when you are starving.  If this is an issue, peel yourself some fruit and take a break.   (My mother lives by this rule).  Secondly, one needs patience in the kitchen.  Don't be in a rush.  Allow yourself plenty of time to make mistakes.   We all make them.   I assure you. You will be making this dish again and again.   
Special note:   I love the suggestion Mary made tonight on the http://www.facebook.com/sundayatthegiacomettis fan page. Be prepared, veal shanks can be expensive.  Her idea?  Buy them one at a time and tuck them away in the freezer.  Several weeks later, just defrost and cook.  This way you don't have to incur that huge expense all at once.  That would make me feel better.   I like the "By them on sale" suggestion.   Don't deprive yourself.   You may even like to try beef shanks or even lamb.  Whatever you try, the method is the same.  Here is the way I make Osso Buco.  Buon Appetito
Ingredients for  2
2 veal shanks with bone marrow about 1pound plus 1/2lb
2 teaspoons of sea salt
2 teaspoons of black pepper
One cup of unbleached flour 
One large carrot (about 3/4 cup diced)
1 large celery rib (about 3/4 cup diced)
1/2 sweet onion (white or italian sweet red, about 1/2 cup diced)
1 large clove of smashed garlic ( that will be removed while cooking)
3 tablespoons of olive oil
1 tablespoon of butter
1 tablespoon of vegetable oil
1 tablespoon of tomato paste
1 cup of white wine
2 cups beef stock or vegetable stock
Optional herbs like handful of sage, thyme.  I like to use sage and rosemary.   Use what you like but sage and veal go well together. 

Method: 
Heat your oil in the pan to medium.
Dry your veal thoroughly with paper towels.

 Salt and pepper your veal generously.  Tie your veal with kitchen string if you like.  This will keep the meat from coming away from the bone while cooking.  (Be sure and remove the string before serving).    Dredge the veal and coat well in flour.   
Heat your oils in a braiser or pot (preferably cast iron), that can comfortably accomodate your veal without crowding the pan.  Make sure it's deep enough to hold your liquids. 
Brown your veal on all sides on medium to low heat, being careful not to burn.

Remove the veal from the pan and cover loosely.   In the meantime, add your onion and a large clove of smashed garlic and saute until fragrant and somewhat translucent.  Remove the garlic and discard.

Add your celery and carrot and mix.  Give it a pinch of salt and put the lid on the pan.  Turn the heat to low for a few minutes.  Lift the lid and give the vegetables a mix until soft being careful not to burn.   When you vegetables are fragrant and soft, add your veal back to the pan and give them a turn.   Add your wine, broth, herbs and put a lid on the pan.

Add your tomato paste, butter and gently turn your veal.
Add your liquids, herbs and put a lid on the pan.   
Cook for about 2 hours.  After an 1 hour and 1/2 remove the lid and give it a turn.  If liquid has evaporated to much, add a little water.  I did not have to do that.  It's all going to depend on finding the right pan to fit your veal. 
Continue to cook until the liquid has thickened and reduced by more than half.   Stick a fork into the veal.  It should easily pass through.   Buon Appetito! 
 Serve the sauce with some pasta or rice.  You can also plate the veal over some rice and top with some of the delicious sauce.  You can plate the veal either way.  Enjoy! Barbara

Wednesday, November 26, 2014

Pasta con Carne in umido con Polpette (Sunday Pasta Sauce)


Had to place a conference call to Mom in NY today about this recipe.  For almost every Sunday of my life, I can remember this dish being made on Sunday Morning.  My mother's meatballs are so inviting.  You can smell them down the street. You can smell them in the garage. I was craving comfort food today. This was perfect.  I don't now how it happened.  I was was wondering if I had added enough cheese to the recipe and my phone rang.   It was my mother again, in that sweet, authoritative voice, demanding that I add more cheese. How did she know?


Ingredients: 
3/4 pound veal
3/4 pork (you can omit the pork and use Ground Turkey.  This sauce was traditionally made with whatever was left over from the week).
3/4  beef
2 eggs
Into a bowl place your meat, 2 eggs, one cup of Parmesan cheese
1/2 cup parsley chopped fine
1 clove of garlic chopped fine (optional)
1/2 cup red onion chopped fine
1 cup of fine bread crumbs plain, plus more for dredging~
3 tablespoons olive oil
1 tablespoon frying oil


In a flat pan, large enough to accommodate your ingredients, heat your oil.  Saute your onion and garlic until fragrant. Remove your onion and garlic in pan and place in bowl with your meat and mix. Then add salt and pepper, eggs, cheese and mix.
Prepare a flat pan and line it with parchment paper.
Assemble your meatballs, using your hands.  Roll about 3  tablespoons into your hand and roll into a ball.  Roll into a ball.  Pass in breadcrumbs and lay on pan covered with parchment.  After you have assemble them all, place in refrigerator for 30 minutes to set.
Heat your oil again, add more if necessary and begin frying your meatballs, in small batches.  Do not crowd them.  Good things need time. Do not rush. Do not worry if they do not seem completely cooed through. As they will continue to coo in the sauce.  They will become more flavorful as they coo in the sauce.  Set them aside to cool.
You can make up to 24 meatballs depending on the size.  I like to keep mine around 2 inches in diameter.


Sauce:
Ingredients:
1 large diced white onion
1 clove of garlic chopped
1 cup medium carrots diced
1 cup diced celery (fine)
1 28 ounce can of San Marzano peeled tomatoes
1 teaspoon of salt/ plus more to taste
1 teaspoon of pepper/plus more to taste
1/2 cup of milk 
1/2 cup white wine
a pinch of Nutmeg
1 cup water
Several handfuls of fresh basil for sauce and for garnish

Drain your oil from the pan you have fried your meatballs in.  Add some white wine to the pan and de-glaze  away the bottom bits from the pan. Drain the entire pan and wipe out.  It will still have a wonderful flavor to the pan.   (You are cooking your sauce in the same pan you fried our meatballs in or you can just use a mixture of veal, pork and beef and brown).  
 Place your pan back on a low heat. Add 2 tablespoons of olive oil to your pan.  Add your meat and brown.  Remove your meat and set aside.  Add your onion, carrots, celery, garlic and saute until fragrant.  Add a little salt to the pan. Put a lid on your pan and let your vegetables sweat for a few minutes.  After 3 minutes remove your lid and mix.  Continue until your vegetables are fragrant.  Add your meat back to the pan. At this point add some of your meatballs.  Be careful not to crowd your pan.  Add your tomatoes, all of your liquids and let reduce on medium. Add your teaspoon of salt and pepper, pinch of Nutmeg.   Simmer your sauce for one hour.  You will notice your sauce will quickly reduce to half. Continue reducing on low.  You will notice your oil will form a ring around the sauce in your pan and your sauce will be thickened.  Turn your heat off and set aside.


Had to chase my family out of the kitchen~lol Meatballs for appetizer too.


Boil your pasta till al dente.   I always serve my pasta first. Mix with some sauce.  Add some Parmesan cheese if you prefer.    In a separate dish serve your meat with plenty of good, crunchy Italian bread~ Buon Appetito.

Special note: My mother would saute various cuts of meat in the pan after frying her meatballs.  Be sure and always drain your pan  and wipe with a paper towel before adding your sauce to the pan.  You can add all of your browned meat back to the pan right before you are ready to add your tomatoes into the pan.

2.  If you wish to bake your meatballs rather than fry, you can do this very easily.   After the meatballs are set on a baking sheet, place them on a low broil for 10 minutes.  Give the pan a shake, low broil 10 minutes more until evenly browned and crisp.  They will taste just like you fried them.  If you use this method your sauce will not be as rich but will still be good.  Enjoy!

Monday, November 24, 2014

Ciabatta bread (Cold Rise Method) Bread making version 2


Good Morning everyone,
A cold rise bread is a great way to help make bread when you just don't think you have time.  It's not that complicated.   If you have a mixer or a food processor, it does all the work for you.  The hardest part is done.  We do not like to wait for anything these days.   Here the longer you wait the better the result.  So be patient.  A cold rise dough extends the life of the fermentation. The acid content in the bread dough is increased.   It helps to add wonderful texture as well as great flavor to your end result.   The longer it's refrigerated, the more flavor it will have.   If you like your bread a bit more sour, leave it to rise a longer time.  It's best to leave it to rise for one long rise in the refrigerator.   It can stay refrigerated for up to 3 days.  
For this recipe, I used white flour.   You can substitute bread flour, or use equal amounts of both.   The bread flour will give your bread more elasticity due to the higher gluten content.  
It's all about the texture.   Bread can be made in all kinds of ways.   The way you decide to rise your dough effects texture, taste and flavor.    If you prefer your bread doughy and dense, yet light and fluffy,  then this method is for you.  

Ingredients:
You will need one food processor for combining your ingredients.  It can be combined by hand.  To mix by hand, you will need to add your flour to the water mixture a little at a time and mix until combined completely.   Try to use a food processor or mixer with a dough hook.  Makes the job much easier and will have you making bread all the time.

Ingredients:
3 cups of unbleached flour (Or any combination of bread/ white flour.  Remember bread flour will give your bread a more elastic end result, which is very good.  Just takes a little practice).
1 teaspoon salt
2 teaspoons active dry yeast
1 cup  plus approx. 1/2 warm water (warm to touch)
1 tablespoons  olive oil
2 tablespoons of Cornmeal
Cooking time:  One hour

Combine yeast and 1/2 cup warm water in bottom of food processor bowl and pulse to combine.  Bubbles will form.. Let stand 5 minutes.
Add another 1/2 cup water, salt,  flour and begin mixing. add your remaining water. Add your flour and Mix.   You will see that within 30 seconds your flour will begin to come away from the sides of your mixing bowl and sticky ball will form.   If it still looks dry, add your remaining water a drop at a time.  If you are unsure, remove the lid and press the dough.. it should be somewhat sticky.  It should look rather elastic.  Do not worry if a complete ball is not formed.    Place flour on your hands and remove from bowl onto a floured surface.  Fold over 2 to 3 times into a ball.  You should see a sticky and smooth consistency.  Do not worry if its sticky.
Place in a bowl large enough for the dough to double in size~On a paper towel  add some olive oil and brush or gently rub  your bowl with it.  Place your dough in the bowl.  Brush  the remaining oil over your bread dough.
Cover with plastic wrap tightly.   Place in the refrigerator overnight and up to 12 hours.  You can even leave it longer up to 18 hours.

When you are ready, remove it from the refrigerator and bring to room temperature.   You will need about an hour.
On a floured surface, remove your flour from the bowl.   Fold over the ends back into the ball.  Place back in the bowl for one hour, covered in plastic wrap loosely.   After the hour of rest, place on a floured surface and with your hands, shape into a log shape or circle.   Ciabatta is rustic, so anything goes.   It's traditionally made into a loaf type shape.
Heat your oven to 450 degrees bake.   If you are using convection, make appropriate adjustments.
Carefully place your Ciabatta loaf onto the sheet and loosely cover again.    Wait for an hour or two.  When you return, it is ready to place in the oven.
Remove the plastic and cut two lines over the top.  Don't cut to deep, this is just for presentation.  You do not have to do this if you do want to.  The bread will rise and create a pretty effect across the top.

The interesting thing about this method is that the bread continues to rise each time.  Don't panic if it looks kind of flat. It will grow in the oven.
On a cornmeal lined baking sheet place in the oven for one hour.   After the first 30 minutes take a peek inside by turning the light on.  Do not open the oven.
Check back in 15 more minutes and make sure things are looking crispy and not burned.  If you need to get a small piece of foil and loosely cover the top quickly.   Leave it in the oven for a total time of one hour.  Let rest 30 minutes before slicing. You will notice it cracking as it cools.  This is normal and the sign of a terrific Ciabatta bread.  Enjoy!

Buon Appetito!


Saturday, November 22, 2014

Pane del Nonno (Grandpa's Italian Bread)

 This is from a previous post. 


It was part of Nonno's ritual to bring the bread to Sunday lunch.  Bakeries on Sunday were always open.  Lines were around the block, after church, on Sunday morning.     Not much was available as far as Italian bread was concerne.d  in the local supermarkets in the 1970's, even in New York.   Local bread bakeries began expanding their territories and delivering to the local markets  (outside of Manhattan), in the early 1980's as many began to move out of the city.    Not ever locality was included as there was only so much supply to go around.  Most bakeries would run out early on Sunday morning,  having sold their supply.    We had almost nothing in Scarsdale, New York, except the local bakery, which happened to be French.  Not acceptable, as they did not carry the Panella bread that we were accustomed to having on the table.    My grandparents lived for years on 116th street and 1st  avenue in Manhattan, where Italian bakeries in the 1970's were plentiful.    My grandfather would arrive so proudly, carrying his bread bag,  as if he himself had baked it.  We would never have a bread plate at the family table, but a lovely Sunday tablecloth, cleaned and pressed for the weekly event.  My grandfather would strategically place the sliced bread at the table with such elegance and grace you didn't dare touch it before lunch.   I must confess,  that when he wasn't looking,  I would get myself a piece and run out of the kitchen!
I learned to make this recently quite by accident. I came across several recipes on the subject and this sounded so interesting,   I just had to experiment some and try it.  I had not come across any good bread   livng here in the Deep South.    For anyone who is craving that long lost Italian bread, and who doesn't have the luxury of living next door to an Italian bakery today, its worth a try. I must admit, living in Tupelo, Mississippi has made me just a little more daring.  This will transport you back in time.


Ingredients:
You will need one food processor for combining your ingredients.  It can be combined by hand.  It does not require as much work as you might think.  Fit your food processor with a dough hook.
One Dutch oven with lid, knob removed.
3 cups of good quality unbleached flour
1 teaspoon salt
2 teaspoons active dry yeast
1 cup  plus approx. 1/2 warm water (warm to touch)
1 tablespoons  olive oil
2 tablespoons of Cornmeal
Cooking time:  One hour
I have tested many bread recipes. This by far gives the best result. It is rather important that you use a heavy cast iron pot to achieve the best result.  i like to use the food processor method for combining ingredients.  It can be done by hand~ This is my favorite as it can be prepared in such a short time and then left to rise in a warm corner of the kitchen while one is out for the day~ While one is preparing dinner it can be placed in the oven and be ready in one hour~
Combine yeast and 1/2 cup warm water in bottom of food processor bowl and pulse to combine.  Bubbles will form.. Let stand 5 minutes.
Add another 1/2 cup water, salt,  flour and begin mixing. add your remaining water. Add your flour and Mix.   You will see that within 30 seconds your flour will begin to come away from the sides of your mixing bowl and sticky ball will form.   If it still looks dry, add your remaining water a drop at a time.  If you are unsure, remove the lid and press the dough.. it should be somewhat sticky.  It should look rather elastic.  Do not worry if a complete ball is not formed.    Place flour on your hands and remove from bowl onto a floured surface.  Fold over 2 to 3 times into a ball.  You should see a sticky and smooth consistency.  Do not worry if its sticky.
Place in a bowl large enough for the dough to double in size~On a paper towel  add some olive oil and brush or gently rub  your bowl with it.  Place your dough in the bowl.  Brush  the remaining oil over your bread dough.
Cover with plastic wrap and towel.
Place in a dark, warm place like inside a kitchen cabinet.  Let rise for 8-12 hours. .The longer the better.  Overnight is good.
Take you covered pot and place in oven at 450 degrees and bake.  You need to warm up the pot you will be placing your bread in.  The lid causes the air to trap and expand your bread while cooking.  If you want the crispy, bakery  texture, this will work~
8 hours later uncover, you should see it double in bulk.  Do not worry about the bubbles This indicates your yeast is active and doing it's job.  Roll out onto a floured surface.  Fold over into a ball again (Should take a few seconds to do).  Let rest on Counter.  Pat down into a flatter
circle about 8 inches round.   Cover  with a towel.
Be careful and remove your hot pan from oven.
Remove the lid.  Be careful as it is very hot.  Sprinkle one teaspoons of Cornmeal in your pan.  Carefully drop your bread in pan. Do not worry if it looks like your pan is much bigger than your bread dough. It should almost fill the bottom of your dutch oven but only be several inches in height now.   Your bread will expand.
 Sprinkle teaspoon of Cornmeal all over your bread.  Place lid back on pan and place in oven.  Make sure your lid is tight fitting as you do not want the air to escape~
30 minutes with lid on.
Remove lid.  You will see your bread has risen some and is light golden.   Let cook approx 30  more minutes without the lid.    You will see the bread turn golden brown.
Remove from Oven. Carefully remove the bread.   Let cool.   Use your fist to Knock on top of the bread.  It should sound hollow almost. You will also hear the bread cracking as it cools down~  A very good indication of Success ~
Enjoy and Buon Appetito~

Sunday, November 9, 2014

Carrots (Baked, Au Gratin, Carote gratinate)


I love it when fans get excited about simple dishes. I am not sure why we don't eat more carrots.    My carrots created quite a stir the other evening both online and on the table.  The key to great carrots is there overall freshness.   Be sure and look for carrots with their green stems attached.  Spend the time to cut and clean them yourself.  They are so worth it.  Try to cut them down in even pieces. Their natural sweetness depends on freshness, so never mind the bagged variety.   If that's all you can find, you may have to give them a longer boil first.   Do yourself a favor and forget them if you can.   The stemmed kind are also a little cheaper both at farmers market and in the grocery.  Look for bright green stems and a firm carrot.

Recipe:  3 pounds fresh carrots cleaned and cut into pieces.
One large pot filled with enough water to cover the carrot pieces.
One whole yellow or white onion diced.
2 tablespoons butter
1 cup of cream
2 teaspoons of salt
one pinch of fresh nutmeg
pinch of sugar (optional)
one teaspoon of pepper
one bunch of fresh sage (you can remove it before serving)
one bunch of fresh rosemary (you can remove it before serving)
1/2 cup Parmigiano Reggiano cheese plus more to taste.
Special Note:  Add some additional fresh herbs and Parmigiano Reggiano cheese before serving. 

Method:  Heat your oven to 350 degrees F.  Cover the cleaned carrots with water and bring to a boil. Add a pinch of sugar.  Boil for about 10 minutes.   If you are using the bagged variety, you may have to boil them 5 minutes longer.  Drain them and set them aside.   In a large, oven proof skillet,  deep enough to accommodate the ingredients, heat the butter until melted.  Add the onion and one teaspoon of salt.    Saute slowly until the onions are translucent and fragrant.   Add your carrots and toss until well coated.  In the meantime.  Heat your cream.   Slowly pour the heated cream (just under a boil), over your carrots.    Add your herbs, the salt, pepper, nutmeg  and turn the heat to low.   After about 5 minutes, turn your heat off.  Cover with Parmigiano Cheese and cover tightly with foil.
Cook, covered for 45 minutes. Remove the cover and low broil for a few minutes until golden. Remove from the oven and serve with fresh Parmigiano Reggiano and some additional fresh herbs for presentation.
  Buon Appetito!


Special Note:  Adding sugar is an option.  It is not necessary if the carrots are very fresh.


Friday, October 31, 2014

Enza's Oven fried Polpette (Meatballs)

I am not sure when my mother started cooking her meatballs in the oven.  My father requested it one day I believe.    I am not even sure if it makes any sense at all.   They do get nice and crispy under the broiler in the oven.  How can you eat just one?  Getting the temperature right is key along with keeping a watchful eye on them.  Here is the recipe:
Ingredients:
One oven proof pan about 12 inches in diameter
3/4  pound of ground  beef (lean 90 percent lean)
1/2 pound lean ground pork, veal or turkey
2 teaspoon salt
one teaspoon pepper
2 eggs plus 2 tablespoons milk 
1 cup Parmigiano Reggiano cheese grated
3 tablespoons  diced yellow or white onion
1 clove garlic diced
One handful of parsley diced
sprig of fresh basil
1 cup of fresh bread crumbs made from day old bread

Into a deep bowl, mix together your ingredients. 

Make the meatballs about 1-2 inches in diameter.  Pass them in bread crumbs again and Set them on Parchment paper and let rest for 30 minutes in refrigerator.


Method:  Set your oven to 300 degrees / bake to warm up.
Place your pan in the oven to warm up.  Remove your pan from the hot oven.
Place some (brush) olive oil to coat the pan.
Place your meatballs in the pan.  Place the oven on low broil.  
Keep watch and after 5 minutes, give them a shake.  Your cooking time is going to depend on the size of your meatballs.  You should get about 20 meatballs from this recipe.  Continue to cook for a few minutes  until they are browned completely.  They cook pretty fast.  Remove them from the oven and shake them again so they  move freely in the pan.
Let cool before serving.  They will be hard to resist.   You can now either add them to your sauce or just enjoy hot out of the oven.  Buon Appetito!


Thursday, October 30, 2014

Risotto con Peperoni Arrosto (Risotto with Roasted Bell Peppers)


Make no mistake about it.  I treat myself well.  My husband and son really missed out. I am eating alone.   A few simple ingredients is all you need for a fabulous Risotto.  I quickly Roasted a half of each color I had.  A few minutes under the broiler is all you need.  When the skin turns black,  quickly remove them from the oven and into a bowl.  Cover with plastic wrap and let cool.
In the meantime Heat about 3 cups of broth.  I prefer to keep vegetable broth in the freezer, always ready to go.  I opened up a great bottle of white wine and set aside a cup for my recipe.  I planned on having plenty of leftover for some Arancini for a future post.  What a great surprise and all for me!
Ingredients: 1/2 yellow
1/2 red
1/2 orange  Bell pepper
1/4 cup diced red Onion
12 oz of Arborio Rice
fresh basil and fresh parsley for garnish
3 cups of broth
one cup white wine
3 teaspoons salt
one teaspoon pepper
3 tablespoons olive oil
one teaspoon of capers
One pinch of Saffron  (one thread or powder)
Method:  Broil your peppers, in the manner explained above, set them aside to cool.  Cover with plastic wrap and peel.  Cover with a teaspoon of salt in a bowl and set aside.  
 Into a large enough pan or mini stock pot to accommodate your finished risotto, heat your oil.  Saute your diced onion.  After a few minutes, when your onion is fragrant, add your rice.  Give it a quick mix and add your wine.   Mix until your liquid is evaporated.  Add your salt.  Add your vegetable broth a little at a time.  Make sure you do not rush this process.  Your total cooking time on a slow simmer is about 25-30 minutes.  Great things can not be rushed.  I like to calmly have my cocktail while I watch this Risotto cook. 

Add  more liquid, keep mixing and let evaporate.  At the 25 minute mark add your saffron.  Mix, add the rest of your liquid and mix again.  The mixing helps the starch release from the rice.   The rice expands and creates a rich, creamy texture.  Add your roasted peppers, mix gently, add some parsley and basil if you like.  Add your capers and  Mix again.  Let our risotto  rest by placing a damp cheese cloth over the top.   Be sure and taste it and make sure its cooked to your liking.  Depending on your type stove, you may have to cook it a little longer.  You can use a thin cloth if you like.  Wait 5 minutes , remove the cloth and serve.

  Remember, patience is key to a successful risotto.  Great things can't be rushed. Remember,  to treat yourself well.   Saluti! Buon Appetito!
(Special note:  If you prefer you Risotto cooked a little longer than 25-30 minutes, be careful not to overcook.  Your risotto should be creamy but slightly firm when cooked). 

Wednesday, October 15, 2014

The Best Chicken Broth (Oven Method)


Who can remember watching those PBS cooking shows here in the States in the late 1970's and early 1980's?  Mom's favorite? Believe it or not, it was the Frugal Gourmet.
Jeff Smith, was an interesting character in his approach to cooking.  I recall how fascinating it was to watch him work his magic on the kitchen.  Although he wasn't Italian, he had a great appreciation for Italian food.  He believed minimizing ingredients helped to maximize flavor.   It was never about several hundred ingredients in a recipe.  It was about the freshness of seasonal ingredients.
Thankfully, I was paying attention. His methods for cooking a deep, rich,  broth was quite inspiring.  Use the same method when making Beef or Veal stock. Oven Roasting gives "Character" to a soup,  great color, flavor and richness.  It's great for using in recipes all week long.  You can freeze it for later to use in risotto's or adding richness to sauces.
Method:
Place your cleaned, dried, chicken parts in a roasting pan. Add any vegetables you like to use .   Here is what I used:
Preheat ur oven to 500 low broil.  If u don't have low broil, try 400 broil, but keep a watchful eye on it, u don't want it to blacken. 
4 chicken legs with half the skin removed
I large  red onion
2 large carrots
1 large stalk celery
Bouquet of various fresh herbs tied together
I used parsley and celery leaves
5 small red potatoes
Place in a preheated, 500 degree oven and hit the broil button .  Leave in the oven a good 10 minutes , being  careful not to burn .   Leave until everything is shiny and golden some, not blackened.  Depending on your oven, it might take a little longer .

Place  a large soup pot on the stove.  Drain your chicken and vegetables and place directly in the pot.   Add 1 teaspoon salt.  Add water to cover.  You should cover your ingredients with water by a good 3 inches or so.  Bring to a simmer. After about 2 hours, it's ready.  You will see a deep, rich, dark golden color.  Let cool and store away for future use in your freezer. Reserve your chicken meat to use in a salad for a light supper, tossed with olive oil and garlic and parsley.
I had another motive.  A bowl of chicken soup for lunch!  Who could resist?  Buon appetito!


Friday, October 10, 2014

Macaroni con Formaggi (Taleggio), asparagi e funghi (Macaroni and Taleggio with Asparagus and Mushrooms

My Mom tells me to this day that a little can go a very long way.  With unexpected company dropping by to watch me cook, not the Superbowl, I knew I better think fast.   I like to keep Ramekins in all shapes and sizes.  With many other foods being served, I wanted to be sure and have something warm and hearty to satisfy everyone.   One pound of Pasta can feed 10 people and here is how.
What you will need:
10/ 5ounce ramekins (you want to have them deep enough for volume without boiling over)
4 oz of Taleggio cut up.  Any, soft, cheeese you like will do. 
One pound of fresh asparagus (trimmed (wood ends removed), blanched, water reserved,
 cut the tops and reserve/dice the rest into small pieces.
One pound of mixed mushrooms.  I used 8 ounces each of oyster and portabella/ sliced thin.  Cooked until reduced in 2 tablespoon of olive oil and salt and pepper to taste.
2 cups of Bechamel (prepared in the Method of Marcella Hazan's book, "Essentials of Italian Cooking."
Optional 4 ounce dice of Prosciutto
Keep plenty of salt and pepper on hand
One cup of Parmigiano Reggiano Cheese (more or less)
Butter for lining your ramekins
Pinch of Nutmeg (Bechamel)
Pasta:  Large Fusilli/ One pound (look for any, large size, pasta shape that will grab the richness of the sauce).
9 quarts of water in a pasta pot  (This is a large pasta size.  The larger that you use, the more water you will need to cook your pasta.
Method:
Place your water on the stove to boil.  Add 3 tablespoons of salt to your water.  Place your lid on your pan and bring to a rolling boil.
In the meantime, prepare your Asparagus.  Blanch, cut and place in a bowl.   Be sure and reserve your water.
Next, cook your mushrooms.   Heat your oil in a skillet.  Take a large garlic clove and smash it.  When the oil is heated some, place your smashed garlic in your pan.  You just want flavor.  Do not cut your garlic into pieces as you will be discarding it.  Cook your mushrooms on medium.  Add a teaspoon of salt, pepper and keep cooking until all the liquid is reduced in your pan.  Your mushrooms will shrink.  This will take about 10 minutes or so.  Do not rush the cooking, as this will affect the overall outcome of your dish. 
Set aside to cool.
In another skillet, prepare your bechamel.   If you can not google or actually have Marcella Hazan's wonderful book, I strongly suggest you purchase one.  It's all you will ever need in the kitchen.  It is available for purchase to the right of this blog too.
  Heat your whole milk slowly.  Melt 4 tablespoons of butter in a large skillet on medium heat.   Add 3 tablespoons of flour, one at a time and mix.  You want to cook your flour, just like you were making a roux.  (If your heat is to high, you will burn your flour.  If this happens, just start over).  Keep it low and slow.   Begin to add your milk, a little at a time.  Turn off your heat.   You will notice your milk will begin to thicken and become creamy.  Continue until all your milk is combined.   Add a pinch of Nutmeg, a Teaspoon of salt and a teaspoon of white pepper.  Set aside.  If the mixture is to thick, add a little more milk.   If to thin, turn your heat back on low and keep mixing.  Miracles happen and it takes practice.   I must admit, I have made plenty of mistakes.  Don't be in a rush.   Set it aside. 

Cook your pasta until firm, right before al dente.
Drain well and set aside.  Combine all the rest of your ingredients (except your Asparagus tips),  into a bowl and mix.  Add your pasta and mix again. 
Divide your pasta mixture into your bowls.  Add about a tablespoon of Asparagus water to each Ramekin.  (If you think your ramekins are two dry, add another tablespoon).
 Top with two asparagus tips each crosswise, then add some grated Parmigiano Reggiano cheese.
(At this point your can either cover them and refrigerate for the next day)
If your cooking:
Place in a Preheated, 375F degree oven for 15 minutes/covered.  Remove the foil and cook for 5 minutes more.  You want just a slight crust on top.  Serve hot/warm
It's easy, fun to make and will always please a crowd.  Remember, a little goes a long way.  (Italian Macaroni and Cheese, I am not telling).

Buon Appetito Everyone!  Enjoy!


.

Thursday, October 9, 2014

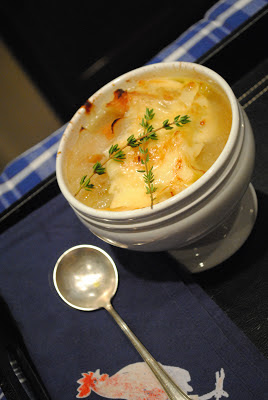
French Onion Soup (Zuppa di Cipolle Francese)


I remember what a treat it was to have French onion Soup.  It was a rare occasion we even went out for dinner,  as my father hated Restaurants.  Long before there were cooking shows, recipe magazines, and fancy restaurants,  there was this soup. It dates back to Roman times.  It was oddly considered a peasant food, since onions could  easily be grown and were plentiful.   It was not until the 18th century that it made a more sophisticated appearance in the French kitchen.   The onions were cooked in butter and a good splash of Cognac or sherry.   Who could blame them?
 I seem to remember making this ahead of a Prime Rib Roast to be served for Christmas dinner and I had not any wine in the house.  I grabbed the Sweet Vermouth. 
Today, it seems many are already on the bandwagon of vermouth.  A sweet, fortified wine, a bit herbaceous, gives this soup that wonderful taste you long been craving.  The traditional Gruyere served over the French version is just to harsh and over powering for us.   An Italian Fontina is a more delicate choice and really brings out this soup's  full flavor.   Enjoy! Buon Appetito!

Ingredients: 
Make 6 hearty bowls plus leftover 
6 oven proof bowls
5 yellow onions (large)
5 tablespoons of butter (one tablespoon per onion)
2 teaspoons of salt
one pinch of sugar
a sprinkling of flour (about a teaspoon)
1 cups of sweet red Vermouth (Martini and Rossi)
8 cups of Beef broth (traditional).  I used chicken broth.  Beef broth would give it a much darker color.
One Bay leaf (to be removed before serving)
2 slices Italian Fontina cheese for each Ramekin or oven proof bowl  (about 12 oz total). 
Fresh Thyme for Garnish

Optional first step:  Blanch your peeled onions quickly into a pot of hot water.   Remove them and dry them off before slicing.  This will remove any acidic residue that gets under the skin of an onion.  


Slice your onions.  Melt your butter over medium heat, being careful not to burn.
In a large, deep, soup pot,  place your sliced onions.  Cook over low, medium heat for about 35-40 minutes.   Continue mixing them, add your salt and a pinch of sugar while cooking.   They will reduce to a 1/4 of what you started off with.  Not to worry, There is plenty of flavor.
You will begin to notice a slight change in color.   Add a sprinkling of flour and mix.   At this point when everything is cooked down and soft, add your Vermouth.   Give it a mix.  Keep mixing as the flour will act as a thickener and just cloud your soup ever so slightly. 
Add your broth,  bay leaf,   and cook for 45 minutes more on a steady simmer.
Place your bowls on a baking sheet.  Slice several pieces of crusty bread and place them in your bowl (about 3 small slices).  Ladle your soup in each bowl.   Crown with slices of Fontina cheese.
(Place your Ramekins on an Oven Proof Baking sheet, remove your fresh thyme).

Place in a 325F degree oven for 10-15 minutes, until your cheese is slightly browned and Melted.  Serve immediately~
Buon Appetito!


Sunday, October 5, 2014

Nonna's Classic Chicken soup

  I was so surprised last night that our son, requested this soup.  I just had to make it.  My mother saids it cures the common cold.  It cured my hunger for sure. My guess is Massimiliano misses his Nonna.

Here are the ingredients to a simple soup that will always make you feel a little better.
Serves 4-6.
4 chicken breasts / skin removed / boneless or bone in
1 large Spanish onion
4 celery stalks
4 medium carrots
4 red potatoes or 2 medium Yukon gold
one teaspoon of salt
Parsley for garnish or celery leaves
8 quarts of water
one large pasta pot (for your soup)
one smaller pot to cook your pasta
6 oz of pasta or Pastina  any one you like
One 2 inch piece of Parmigiano Reggianno.  The end, back piece, cleaned and trimmed.  The back piece is harder (closest to the rind),  and is just in the soup pot for added flavor.

Tonight I made Version number 1 with chicken breasts.  A very small percentage of fat still remains on your chicken breast even if they are cleaned.  It was what I had on hand.  It still has wonderful flavor.

Bring your cleaned vegetables to a boil.  Add salt to the pot.  Once the vegetables are boiling, add your chicken pieces and your piece of Parmigiano.   Bring to a boil and simmer for 3 hours.  Your chicken will cook, come apart in your soup.  Discard any bones you see.   I like to strain my soup in a separate pot reserving as many chicken pieces in a separate plate. Set the chicken aside and shred.   Break 6 oz of spaghetti in tiny pieces.  Bring 4 cups of your broth to a boil and cook your pasta in your broth.  Cook till just under al dente as your pasta will continue to cook in your hot soup.   Shred some chicken over the top of your soup.    Serve hot in large soup bowls.  You may add a sprinkle of grated Parmgiano Reggianno if you like.

Version 2:
I learned this trick from a fabulous cook years ago on Public Television here in the States.   We have had great debates over it with my mother who insists there is only one way to make this soup.  I must admit, it works very well as it intensifies the color and flavor of your broth.
One roasting pan
Place an 8qt pasta pot filled with water on the stove to boil.
Follow the above recipe ingredients
Place your vegetable under the oven broiler  for 5 minutes.  Be careful your vegetables and chicken does not burn.  You just want a golden color.
Place your vegetables, chicken and all the juices from your roasting pan into your pot.  Bring to a simmer.  Add your 2 inch piece of Parmigiano and let simmer for 3 hours. Try either method and see which one you like.    Follow the above directions and serve.
Buon Appetito!


Saturday, October 4, 2014

Vegetable Soup with Kale (Minestra di Kale)

My mother would often tell me "A good Minestrone solves everything."  I have always thought, it had more really to do with cleaning out one's refrigerator with items that really needed to be used up.   When it comes right down to it, minestrone can be made with any vegetable.   Some garlic, onion, tomato paste and some olive oil is always the basis for any good Minestrone. I have several versions here on my blog.  
 It is a very pretty, colorful dish, full of flavor.   The important thing to remember, when dealing with baby greens is to always add them during the last few minutes of cooking.   When your greens wilt, turn off you soup and get ready to serve.  This helps keep the vitamin content where it belongs, in the vegetable.  
  I will be pureeing the leftovers today, enough for 2 more cups.   All you need is about 45 minutes and about 15 minutes of prepping your vegetables.   More pictures will come later.  Buon Appetito!
Ingredients:  One small onion chopped
                     2 cloves of garlic minced
                     3 tablespoons of olive oil
                     2 tablespoons tomato paste 
                     2 teaspoons salt
                     1 black pepper
                     One zucchini chopped into small pieces
                     One carrot diced
                     One red potato diced (optional)
                     Optional 1/3 cup of white wine
                     4 cups of homemade broth.   You may use water if not                      available.  
                     Piece of the rind of the Parmigiano Reggiano cheese.  Be sure and clean it first by running it under the water and scraping the back off some until cleaned.   You can discard this later in the soup or puree it along with the soup.   
                     
Method:    Wash and dry about 5 oz of Baby kale and set aside
Heat your olive oil in a 4 quart soup Pot
Saute onion until translucent
Add the carrot diced
Add  garlic until fragrant
Add 2 teaspoons salt
1 teaspoon Pepper
Add tomato paste and mix.   Add the zucchini, diced potato and mix again.   Heat and mix until everything is well coated.  You may add a pinch more salt.   I like to add 1/3 cup of white wine and let it boil away.    This is an option as the alcohol will evaporate but leave behind wonderful flavor.   Add your broth and bring to a simmer.  Toss in the rind and cover your pot with the lid barely open.  Cook for about 45-minutes to an hour.   Remember the smaller you cut the vegetables, the faster it will cook. 
About 5 minutes before the end of your cooking time, add the greens and mix.  Adjust for salt.   Turn off your heat and let cool some.  Discard the rind and serve in bowls with Crusty bread.   Adjust for salt.   It's light and delicious and very healthy, I might add. 


Wednesday, October 1, 2014

Stuffed olives (Olive All'Ascolana)

The olives in the Marche Region of Ascoli Piceno are rumored to be the best in all of Italy.  The meaty and mild tasting flesh along with the smaller than usual pit, makes them ideal to snack on.   It was the ancient Roman writer, Martial who described that olives from this region were served at every banquet both as an appetizer and at the end of the meal to cleanse the palate.   It was also rumored that Nero and his entourage were big fans.  Who could blame them?   It wasn't until the 18th century, in the Southern Marche,  that some inventive cook decided to stuff them.   What a wonderful idea.
The variety is called Tenera Ascolana and only grows in the chunky soil of Ascoli Piceno.  Today, the variety is hardly exported at all.   I like to substitute pitted, Spanish Manzanilla, readily available in almost every market around the world.  They are fairly easy to handle in the kitchen and very forgiving.   Take your time and make a bunch.   I like to keep mine in freezer bags of 10, ready to go.     Remember to fry in enough vegetable oil to cover.   Serve them hot.  You won't be able to resist. 
 If you are ever find yourself wandering through Ascoli Piceno,  be warned, leave room for plenty of Fried Olives!  Buon Appetito!

Special Note:   The traditional recipe is made with Pork, beef and chicken livers.  There is a great debate today over the use of cinnamon in the recipe.  I do not use it.   Any piece of chicken will do fine.  It's very forgiving.  You will need a food processor for this recipe.  
Ingredients:
30  queen olives, pitted, cleaned and dried.  If you are using olives that are stuffed, you will need to remove the stuffing by hand, rinse and dry.  Be careful not to tare the olive to much, but if you do, no worries, they come back together nicely when assembled.  
In a deep plate:  3 eggs beaten 
In a deep plate:  2 cups unbleached flour
In a deep plate:  2 cups breadcrumbs
You might need to adjust this some.  It's going to depend on the size of your queen olive.
2 tablespoons of extra virgin olive plus one tablespoon of vegetable oil in a medium size skillet.
1/4 pound ground beef or slice of ground chuck, cut up
1/4 pound ground pork or slice of pork loin cut up
1/4 pound ground chicken or boned chicken thigh
3 tablespoons diced onion
3 tablespoons diced carrot
3 tablespoons diced celery
one tablespoon Tomato paste diluted in 2 tablespoon water 
2 tablespoons of bread crumbs for the stuffing
one egg for the stuffing
1/4 cup of Parmigiano Reggiano cheese
A pinch of Nutmeg
The zest of 1/4 of a fresh Lemon
Method:   Let me just say that this recipe just takes practice.  Be prepared for your hands to get sticky, flour everywhere.  It just comes with the territory.   
Step 1:
Place your skillet and oils on the stove and heat to medium.  Slowly slip in your meats and cook until lightly golden but cooked through.   Remove them from the pan to cool and place your vegetables in the pan.   Mix and cook until soft and fragrant.  Add the tomato paste and continue to cook until the liquid is evaporated and slightly thickened.   Turn your heat off under the pan and set aside to cool.  
Step 2:
In the processor place the contents of your skillet (meat, vegetables, oil),  and give it mix until thoroughly combined.  It will already look somewhat pasty.   Add your cheese, pinch of nutmeg, a little bit of egg (to help combine) and your lemon zest.   Give it a good mix/ pulse until pasty again. You should be able to smell the fragrant smell of lemon.  If you do not, add a bit more zest.  If it looks to wet, add some bread crumbs a tablespoon at a time.  You want it sticky but not wet.   
Step 3:  Grab an olive in one hand, some stuffing in between your fingers and attempt to place it inside the olive.  The olive will tare some, this is normal.   To help put it back together,  pass it in the dish of the flour.  Use your hand to form a ball. It just takes very little stuffing.  Just takes practice.  If the olives splits in half, discard it and start again.  After a while, you will get the hang of it. It's a messy job but very worth it.  Then, place the olive in the egg mixture, followed by the bread crumbs.    Continue with this method until you have a tray full.   Let them rest in the refrigerator some to set. 
Step 4:
You can now either begin to fry them in Vegetable oil.  Remember to use a deep enough skillet.  They must be completely submerged in hot oil.  Test the oil by sprinkling some breadcrumbs in it.  If it sizzles, gently drop some olives and fry.  Give them a light shake to move around the pan to fry evenly. 
Drain on paper towels and serve hot.  

Buon Appetito!